IIS, or Internet Information Server, is a web server application that you use to set up your own web server, and publish your own content. You can use IIS to set your computer up to act as an Internet web server, or it can be used locally to serve an intranet. Many companies use intranets as a resource for employees to share information and can be very useful.
When you first install Microsoft Windows 7, IIS is not turned on by default, so in other words you cannot begin to publish websites straight out the box. It is however, easy to turn on, and this is how you do it.
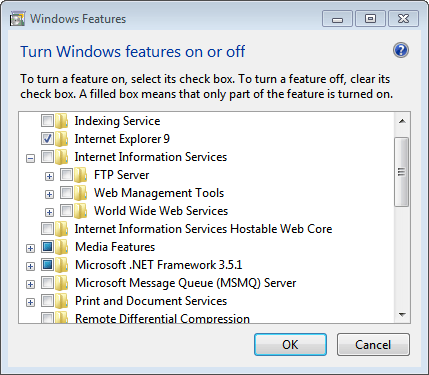
Firstly, you need to go to your start menu, and click on Control Panel. This is an area where you can alter settings on your computer, and add or remove specific programs. Find the section called “programs” and click on it. This should bring up a new window with a list of selections. One of these options will be to “turn windows features on or off”. Find this and click on it to go to the next screen.
The next screen will be a long list of windows features that are already a part of Windows. Some will be turned on already by default, and some will be switched off. You need to find the section called “Internet Information Services” and click on the plus symbol next to it. IIS has many parts to it, and by expanding this section, you are revealing all those parts so you can choose which ones to turn on.

You will see three sections, FTP Server, Web Management Tools, and World Wide Web Services. Each one will have multiple options inside. The main one will be under Web Management Tools, and will be called “IIS Management Console”. You need to check this box. This effectively turns on IIS on your system. While you’re in this section, you can also check any other features you think you may need. For example if you want to set up your computer as an FTP server, you can check the boxes related to that. FTP will allow you to give access to some of your files to friends and work colleagues by giving them login permissions. The will then be able to download files you give access to directly from the Internet. They may also be able to upload files directly to you computer if you give them access to do so. FTP can be a very useful feature.
However, now that you’ve checked the “IIS Management Console”, all you need to do is click on “apply”. You may then need to reboot your computer, as Windows will need to make certain changes in order to activate the new feature. Once you’ve rebooted, you should be able to go to the address http://localhost/ on your computer in order to access IIS. Of course you’ll need to set up the system and then design your web-pages, but for now you have successfully set up your very own web server.
© Melanie Gross for gHacks Technology News | Latest Tech News, Software And Tutorials, 2011. | Permalink | Add to del.icio.us, digg, facebook, reddit, twitter
Post tags: ftp server, iis, internet information service, server, web management tools, world wide web services

You must log in to post a comment.